![]()
![]()
![]()
![]() The permission system is deny-prioritized, that is, a user may be denied access to a document if the file type, project, site, or workflow stage which applies to that document is restricted for that user. For example, if a user's access to a document is allowed according to file type, and associated project permissions are not set, yet site is denied, the user cannot access documents for that site.
The permission system is deny-prioritized, that is, a user may be denied access to a document if the file type, project, site, or workflow stage which applies to that document is restricted for that user. For example, if a user's access to a document is allowed according to file type, and associated project permissions are not set, yet site is denied, the user cannot access documents for that site.
>> To configure permissions
| 1. | Launch the Permission Editor window by clicking on the Permissions (or SDMS Permissions) link in one of the following applications: |
| • | Main Menu > Utilities > User Management |
| • | Main Menu > Utilities > SDMS Admin > File Types tab |
| • | Main Menu > Utilities > SDMS Admin > Flags tab |
| • | Main Menu > Organizations/Projects > Project Manager |
| • | Main Menu > Resources > Sites |
| • | Main Menu > Resources > Sites > Service Groups tab |
The link opens a window where you can configure permissions according to the application in context, such as for users in the User Management application. The highlighted member in the application is for whom you are configuring the permissions. In other words, if you highlighted a user in the User Management application, you can use the Permissions Editor window to configure the accessibility of SDMS documents for that particular user. If you highlighted a site or team in the Sites application, you are configuring the permissions for that particular site or team.
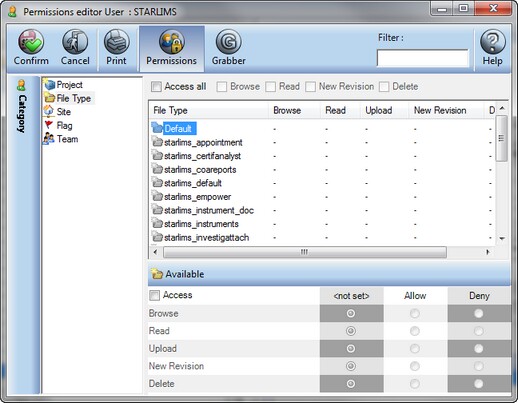
A typical Permissions editor window is shown. Depending on the category selected, the right-side pane may display different elements. For example, Flag includes the Add Flag and Remove Flag options. Team includes a list of service groups across sites with access to SDMS, and in order to give the user permission to view documents available to certain teams, you mark the check boxes for those teams.
| 2. | Select one of the categories such as Project, File Type, and so on. The associated list, such as all file types, is displayed in the right-side pane. |
| 3. | You can filter the list of the entries pertaining to a selected category by entering the letter(s) found in the relevant name(s) in the Filter text box. |
| 4. | To configure access to one particular member listed in the right-side pane, such as a file type, highlight it. In the bottom pane, the Access check box is enabled. |
| 5. | Mark the Access check box. The bottom set of permissions are enabled specific to the highlighted item. These include Browse, Read, Upload, New Revision, and Delete, which can be set to either Deny, Allow, or <not set>: |
| • | Deny (D) takes precedence over Allow and <not set>. |
| • | Allow (A) takes precedence over <not set>. |
| • | <not set> (-) when marked, permission can be set at any other level in the access tree. |
Set the permissions that you want. You can highlight additional items and apply permissions to them, one at a time.
![]() NOTE The Flag category includes the Add Flag and Remove Flag permissions, which determine the ability of users to add or remove flags for documents. Adding a flag cannot permit the upload permission as flags are attached to documents already existing in SDMS.
NOTE The Flag category includes the Add Flag and Remove Flag permissions, which determine the ability of users to add or remove flags for documents. Adding a flag cannot permit the upload permission as flags are attached to documents already existing in SDMS.
| 6. | After making your selections, click Confirm to apply your selections. |
![]() NOTE The username STARLIMS is a predefined system account that cannot be retired. It is necessary for executing processes between SDMS and LIMS such as synchronizing user information and importing instrument files into the LIMS system.
NOTE The username STARLIMS is a predefined system account that cannot be retired. It is necessary for executing processes between SDMS and LIMS such as synchronizing user information and importing instrument files into the LIMS system.