![]() Dataset templates facilitate the process of extracting parsed or translated data using the CCXML format. When the data files (documents) that have entered SDMS are parsed, or instrument messages that have been received by the system are translated into reprehensible information, dataset tables can be generated to contain this parsed or translated data, while you are choosing which kind of data should fill these tables. Instead of building dataset tables which would include the required data every time anew, you can select one of the ready dataset templates and modify it according to your needs using the Dataset Prototype Editor window. For more information about generating dataset tables, see section Generating Message Dataset.
Dataset templates facilitate the process of extracting parsed or translated data using the CCXML format. When the data files (documents) that have entered SDMS are parsed, or instrument messages that have been received by the system are translated into reprehensible information, dataset tables can be generated to contain this parsed or translated data, while you are choosing which kind of data should fill these tables. Instead of building dataset tables which would include the required data every time anew, you can select one of the ready dataset templates and modify it according to your needs using the Dataset Prototype Editor window. For more information about generating dataset tables, see section Generating Message Dataset.
To accommodate requirements of different facilities, the system allows building dataset templates and storing them directly in the required database. To do that, the database must be connected to your SDMS site (server). You can create a new database connection from within Dataset Prototype Editor window. For detailed instructions about building a new database connection, see section Database Connections.
>> To build a dataset template
| 1. | Log on as a user with access to Utilities > SDMS Admin and open that branch in the console. |
| 2. | Click on the Dataset Templates tab to view available templates. |
| 3. | To add a new template, click Add; the Dataset Prototype Editor window appears with the Add Table dialog box open. |
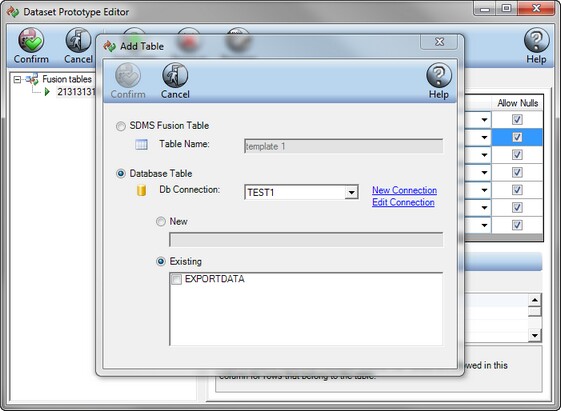
| 4. | In order to start building the template, you need to start by either building a new dataset table, or modifying one of the existing dataset tables from any of the available databases. |
| • | To create a new dataset table in a virtual SDMS database, select the SDMS Fusion Table option and specify the name of the table in the Table Name box. |
| • | To modify an existing dataset table from an external database, select the Database Table option. Select the relevant database connection name from the DB Connection drop-down list; the Existing field displays the tables which are stored in this database, allowing you to select the relevant table. If the database to which you want to connect has not been connected yet to your system server, click the New Connection link; to edit an existing connection, click Edit Connection. For instructions about building/editing a database connection, see section Database Connections. |
| • | If you want to build a new dataset table to be stored in the selected database, select the New option, and type name of your table in the adjacent field. |
| 5. | Click Confirm; the Dataset Prototype Editor window displays the details of the selected dataset table (or empty rows of a new table). The window consists of the following panes: |
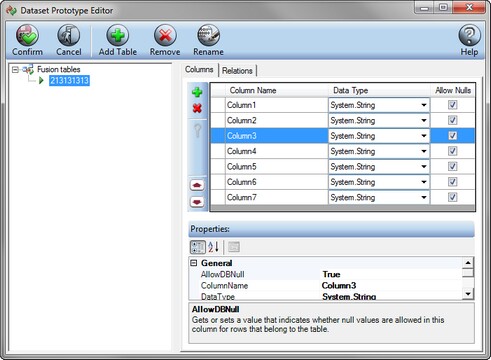
| • | The left-hand side pane of the window displays the connection name of the database of the selected table and the name of the dataset table in the form of a collapsible tree. |
| • | The body of the window displays the details of the table's columns, including the name of the columns, the data type contained within them, and whether this is possible to allow null values in the columns' fields. |
| • | The lower part of the window displays properties of the selected column row. |
| 6. | Add as many tables as you need to your template using the Add Table button. Note that you can also delete and rename your tables using the Remove and Rename buttons. |
| 7. | Select the relevant table on the left-hand side pane of the window. Click the Add Column button to add columns to your table, and specify the column properties: |
| • | Double click the Column Name field of the new column and type the name of the column. |
| • | Click the arrow adjacent to the Data Type field of your column, and select the type of data to be contained in this column (string, character etc.) from the drop down list. |
| • | Mark the Allow Nulls field of your column if you want to include null values in the column field. |
| 8. | Add as many columns as you need to complete your table. To further modify the column properties on the lower level, select the relevant column, and enter relevant values in the Column Properties field group. Double click the relevant field so that it becomes editable, and select or type in the required value. The function description of each property appears upon selecting it below the Column Properties field group. |
| 9. | Click Confirm to save the new template; in the Save Dataset Table dialog box that appears, type the template name and click OK. Your template is ready now and its built/modified tables will contain the data types that you defined in the Dataset Prototype Editor window. The data will come from the parsed/translated SDMS data and will fill these tables according to your definitions above. |