![]() When the system translates the message received from a laboratory instrument into a readable CCXML format by the translation rules set by the user, it is possible to retrieve from this message only the information which is relevant to the user at the given moment. For example, one may wish to see only the name of the patient, the name of the test which was performed, and the test result. For this purpose, the user builds a table which shall include all the relevant information. The user essentially chooses from the translated message nodes the ones relevant for the table, to be included as the table columns, and designs these columns, using the variety of options described below. The system then retrieves the requested items from the translated message, and fills in the relevant data in the user-designed columns. Note that this is possible only when you have translated the instrument message using a translation template, as described in section Designing the Protocol Message Layer.
When the system translates the message received from a laboratory instrument into a readable CCXML format by the translation rules set by the user, it is possible to retrieve from this message only the information which is relevant to the user at the given moment. For example, one may wish to see only the name of the patient, the name of the test which was performed, and the test result. For this purpose, the user builds a table which shall include all the relevant information. The user essentially chooses from the translated message nodes the ones relevant for the table, to be included as the table columns, and designs these columns, using the variety of options described below. The system then retrieves the requested items from the translated message, and fills in the relevant data in the user-designed columns. Note that this is possible only when you have translated the instrument message using a translation template, as described in section Designing the Protocol Message Layer.
Instead of building dataset tables which will include the required data every time anew, you select one of the existing dataset templates and fill the required data in the already built column forms, configuring the column fields according to your needs. If needed, you can also modify the template. For more information about dataset templates, see section Dataset Templates.
>> To create information table
| 1. | Perform the steps of the first procedure in section Designing the Protocol Message Layer to build your template. |
| 2. | Press the Dataset button on the top toolbar of the Protocol Designer window; the Dataset Generator window appears with the Add Dataset dialog box open. |
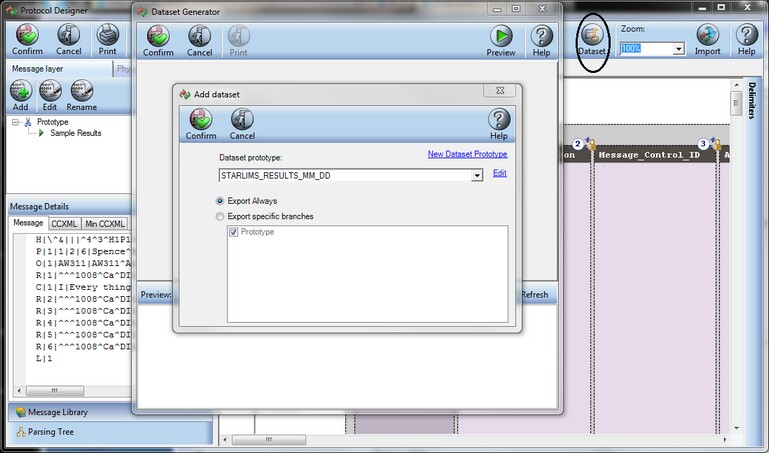
| 3. | In the Add Dataset dialog box, select the relevant dataset template from the Dataset prototype drop-down list, and then do one of the following: |
| • | Click Confirm the open selected template in the Dataset Generator window; |
| • | To edit the selected template, click the Edit link; the selected template appears in the Dataset Prototype Editor window that opens. For more information, see section Dataset Templates; |
| • | To create a new dataset template, click the New Dataset Prototype link. For more information, see section Dataset Templates; |
| • | If you want this table to always appear in your CCXML, mark the Export Always radio button; |
| • | Select in which PMDO branches (your template's message types) your table will appear when it is translated into the CCXML format. |
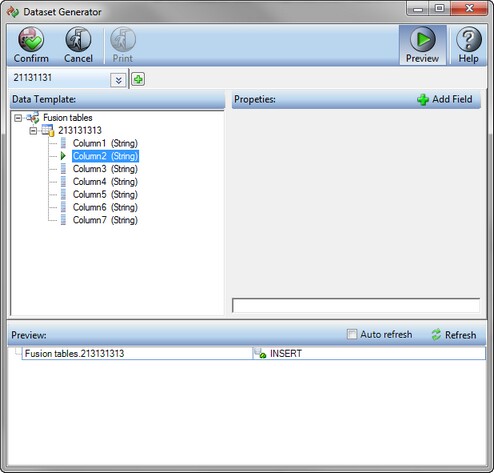
| 4. | After you finish dealing with selecting and modifying the dataset template and click Confirm in the Add Dataset dialog box, the Data Template pane of the Dataset Generator window displays the template's details as a collapsible tree, built using the following logic: |
| • | The parent branch displays the connection name of the database of the selected table. To learn more about database connections, see section Database Connections. |
| • | The name of the dataset table appears immediately below the name of the database connection. |
| • | Immediately below the name of the table the rows comprising the table appear. |
| 5. | Use the arrow adjacent to the name of the template that appears above the Data Template pane to: |
| • | Rename the template, selecting the Rename option from the pop-up menu, and typing the relevant name in the field. |
| • | Delete the template, selecting the Delete option from the pop-up menu. |
| • | Edit the template, selecting the Edit option from the pop-up menu; the Edit Dataset dialog box that appears with options identical to these of the Add Dataset dialog box. For more information, see the explanation about the Add Dataset dialog box above. |
| 6. | Now this is time to start designing your table's columns. Select the relevant column branch from the Data Template pane, and click the Add Field button in the Properties pane of the window; the Properties pane displays data field configuration options. For the detailed instructions about dataset columns configuration, see section Designing Dataset Table Columns. |
| 7. | Configure all the table's columns, by selecting them in the Data Template pane and defining their data fields in the Properties pane as described above. The lower Preview pane displays the table you are building simultaneously with your selections. |
![]() NOTE If you need to change some of the template's definitions, for example to change the column's data type (String, Character and so on), you can go to the template editor at any time by selecting the Edit option from the pop-up menu available by clicking the arrow adjacent to the dataset template name. In the Edit Template dialog box that appears, click the Edit link to open the Dataset Prototype Editor window and perform the necessary changes to the template.
NOTE If you need to change some of the template's definitions, for example to change the column's data type (String, Character and so on), you can go to the template editor at any time by selecting the Edit option from the pop-up menu available by clicking the arrow adjacent to the dataset template name. In the Edit Template dialog box that appears, click the Edit link to open the Dataset Prototype Editor window and perform the necessary changes to the template.
| 8. | If you want to add more tables from different dataset templates, click Add Dataset Template |
| 9. | When you finish designing your table(s), you can click the Preview button to preview the generated dataset tables. Click Confirm to save your selections. |