![]() After you have broken your message into separate nodes using the message separators, you need to define configuration settings of these nodes, determining how they will appear in your template. The following procedure is the continuation of the procedure in section Designing the Protocol Message Layer.
After you have broken your message into separate nodes using the message separators, you need to define configuration settings of these nodes, determining how they will appear in your template. The following procedure is the continuation of the procedure in section Designing the Protocol Message Layer.
>> To define nodes' configuration settings
| 1. | Perform Steps 1-9 of the first procedure in section Designing the Protocol Message Layer. |
| 2. | In the body of the window, select the message part which you want to configure; the Configuration pane appears. |
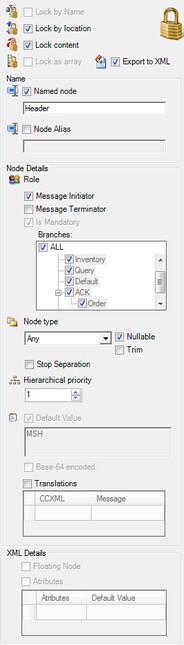
| 3. | Lock the node to secure it in your template, using one or more of the following options: |
| • | Secure the location of this node in your template by marking the Lock by location option. |
| • | Secure the content that this node contains to your template by marking the Lock content option. Note that if this node contains an array, the system will count and preserve the number of registers. |
| • | If the node contains an array, meaning a number of registers that may vary, secure them as a group in your template by marking the Lock as array option. |
![]() NOTE In order to start configuring a node, you first have to configure its parent node. Alternatively, you can configure the root node in the record, and then it will represent the configuration of the entire record. Consequently, if you have broken a node into several registers and want to configure these registers, this node should be configured first.
NOTE In order to start configuring a node, you first have to configure its parent node. Alternatively, you can configure the root node in the record, and then it will represent the configuration of the entire record. Consequently, if you have broken a node into several registers and want to configure these registers, this node should be configured first.
| • | Enable or disable exporting the data contained in the node to the CCXML by marking/clearing the Export to XML option. |
| 4. | Prepare the node to be exported into different databases by giving it a name that reflects the content it contains. To do so, mark the Named node option, and enter the name of the node. You can also give it an alternative name using the Node Alias field. |
![]() NOTE All node names have to be unique. And, only nodes with defined names will appear in your CCXML.
NOTE All node names have to be unique. And, only nodes with defined names will appear in your CCXML.
| 5. | In the Node Details field group, enter the following data to define the node's properties: |
| • | Select the Role of the node: define it as the permanent message initiator that comes at the beginning of the message in your template by checking the Message Initiator option. Alternatively, you might want to define it as the node that closes the message by marking the Message Terminator option, or define it as a necessary part of your template by marking the Is Mandatory option. |
![]() NOTE Defining a node as mandatory in your template will prevent other messages that do not contain this specific value from being parsed according to this template. For example, if you have inserted into your PMDO a message that is identical to the already existing one except that it does not contain the node that you defined as mandatory, the system will not process it according to the existing message and will create a new branch for it in the Message Library pane, which you will have to configure. For more information about navigating using the Message Library pane, see section PMDO Navigation.
NOTE Defining a node as mandatory in your template will prevent other messages that do not contain this specific value from being parsed according to this template. For example, if you have inserted into your PMDO a message that is identical to the already existing one except that it does not contain the node that you defined as mandatory, the system will not process it according to the existing message and will create a new branch for it in the Message Library pane, which you will have to configure. For more information about navigating using the Message Library pane, see section PMDO Navigation.
| • | In the Branches field, mark the message library branches to which you would like to apply the node's role (which you defined in the previous step). You can also select all of the branches by marking the All check box. Learn the logic behind the message library branches in the PMDO Navigation section. |
| • | Select the type of the node in your template by selecting it from the Node type drop-down list (String, Number, Character and so on), and if its data type can be set to the value NULL, indicate this by marking the Nullable option (if it is not already marked by default). To erase spaces at the beginning/end of the node content, mark the Trim option. For more information about possible configurations for the Number and Date Time node types, see section Number and Date Time Node Types. |
| • | If you would like to stop the process of message separation that has been applied up to this node at this particular place in your template, mark the Stop Separation option. Note that marking this option stops all separators except for those whose type has been defined as Global, and also except for the separators set for this node only. |
| • | If you want to situate the nodes in relation to one another in a parent-child relationship, enter the relevant value in the Hierarchal priority box. For example, if you want this node to always be a child of the previous one in your template, enter the value 2 in the box. |
| • | If you want to define a default value that this node will contain in your template, mark the Default Value option and enter the relevant value in the field below it. |
| • | Enter direct translations of the entire node value from the message into CCXML and vice versa in the translations table. For example, in the Message column, enter the letter P, and in the CCXML column, enter the translation, Patient. |
| • | To use the coding algorithm base-64 for translation, mark the Base-64 encoded option. |
| 6. | In case you entered an XML message (instead of a regular message), you can define its following properties in the XML Details field group: |
| • | Select the Floating Node option if you want your node to be able to attach itself to any parent node or record. |
| • | Mark the Attributes option if you want to define default values for the XML attributes of this node, and fill the Attributes table accordingly. |
| 7. | To apply your selections, click Apply. |
![]() NOTE Each time you want to cancel your last application action, click Undo, situated at the top toolbar of the Protocol Designer window. Alternatively, to re-apply a canceled action, click Redo.
NOTE Each time you want to cancel your last application action, click Undo, situated at the top toolbar of the Protocol Designer window. Alternatively, to re-apply a canceled action, click Redo.