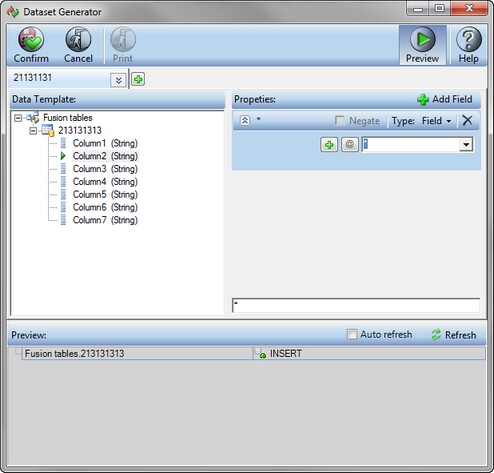
![]() After you have chosen and maybe modified the dataset template on which you are going to base your dataset table, you can start designing the table columns, which are part of the template. By doing so, you define what kind of data shall be included in the table columns, and what the conditions for populating these columns are.
After you have chosen and maybe modified the dataset template on which you are going to base your dataset table, you can start designing the table columns, which are part of the template. By doing so, you define what kind of data shall be included in the table columns, and what the conditions for populating these columns are.
>> To define column data fields configuration settings
| 1. | Perform Steps 1-6 of the procedure in section Generating Message Dataset. |
| 2. | In the Data Template pane of the Dataset Generator window, select the column which you want to configure, and click Add Field in the column's Properties pane. |
| 3. | Click the arrow adjacent to Field to select the field type of your column: |
| • | To include a node's value in the column, select the Field option. This is the default option. |
| • | To include the name of the node in the column, select Name. |
| • | To copy a previously created column, select the Copy Column option and type the name of the relevant column in the field. The entire column configuration (except the name) will be applied to your column. |
| • | Select the Constant option and type the constant value in the field if you want to specify a constant value in the column. |
| • | To delete the field, click |
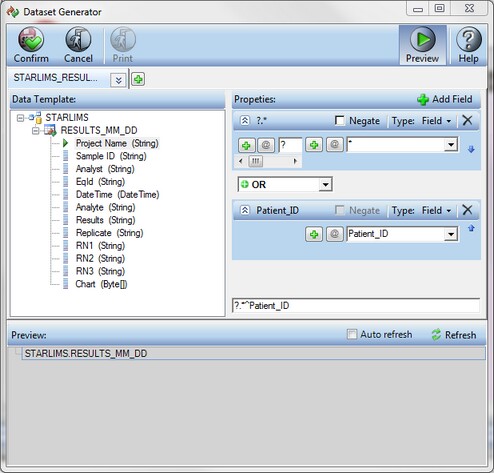
| 4. | The remaining steps of this procedure are relevant if you are using the default Field option. From the drop-down list, select the node which you would like to include in the column. The list includes the names of nodes and their alias, as you defined during the translation template design. You can also select *, which will mean everything (all nodes), so that, for example, the values of all nodes of a certain parent (which you define in the next step) shall be included in the column cell. |
| 5. | Click As Array |
| 6. | If you want only the values of nodes that belong to a specific parent (a record or an array) to be included in your table, click Add Parent |
| 7. | If you want to allow multiple parents selection, meaning that the parent node may differ in accordance with a certain circumstance, define it in one of the following ways: |
| • | Select * from the drop-down list if you want the parent node to represent any or all of the parents who appear in the list. |
| • | Select ? from the drop-down list if you want the parent node to represent only the specific parent of the first child node who is positioned in the relation to the child exactly as it appears here in the system. |
| • | To present nodes who have the same name but belong to a different parent than the one you defined above, mark the Negate check box. |
| 8. | To add another field to the column cell, click the Add field link. Repeat the above steps of this procedure to design this filed as needed. This additional field will supply the values as configured in addition to or in replacement of the values configured in the above field. |
| • | If you want to add another condition according to which the values will be filled in the column cell, select the AND operator from the drop-down list in between the fields. |
| • | Alternatively, to add another field to the column cell, select the OR operator. |
![]() NOTE The operator priority works as follows: AND is always calculated before OR, so that if you are building a formula containing a number of fields where both operators are used, the system will calculate the fields separated by AND before these separated by OR.
NOTE The operator priority works as follows: AND is always calculated before OR, so that if you are building a formula containing a number of fields where both operators are used, the system will calculate the fields separated by AND before these separated by OR.
![]() NOTE In cases when a constant value is defined in conjunction with an AND operator, the system shall present the nodes that answer the configuration criteria and have the same value as the constant. In cases when a constant value is defined in conjunction with an OR operator, the system shall use the constant as a default value, so that when the column cell is empty, the constant value will appear.
NOTE In cases when a constant value is defined in conjunction with an AND operator, the system shall present the nodes that answer the configuration criteria and have the same value as the constant. In cases when a constant value is defined in conjunction with an OR operator, the system shall use the constant as a default value, so that when the column cell is empty, the constant value will appear.
| 9. | Click Confirm to save your selections. |