![]() You can use the SDMS Grabber icon on your task bar to log onto SDMS. If the Grabber icon does not appear, you may need to install the SDMS Grabber using the Advanced tab of the SDMS Admin application. For more information, see section Installing Grabber.
You can use the SDMS Grabber icon on your task bar to log onto SDMS. If the Grabber icon does not appear, you may need to install the SDMS Grabber using the Advanced tab of the SDMS Admin application. For more information, see section Installing Grabber.
>> To start up SDMS Grabbers
| 1. | If it is not configured, configure the SDMS Grabber application as described in section Configuring SDMS Grabber Settings. After it is configured, the Grabber application icon displays its status on the task bar. The available statuses are: |
![]() Ready - The Grabber was started, and it is ready to capture files.
Ready - The Grabber was started, and it is ready to capture files.
![]() Not logged in - The Grabber is disabled.
Not logged in - The Grabber is disabled.
![]() Uploading - The Grabber is in the process of uploading a file.
Uploading - The Grabber is in the process of uploading a file.
![]() Paused - The Grabber was paused while uploading documents.
Paused - The Grabber was paused while uploading documents.
![]() Resume - The Grabber is in the process of starting the service.
Resume - The Grabber is in the process of starting the service.
![]() Not connected - The Grabber service is not responding.
Not connected - The Grabber service is not responding.
![]() IMPORTANT When the Grabber application is active on your computer, make sure to turn off operating system functions Sleep mode and Hibernation. Otherwise, they are likely to cause inconsistencies in the Grabber's activities.
IMPORTANT When the Grabber application is active on your computer, make sure to turn off operating system functions Sleep mode and Hibernation. Otherwise, they are likely to cause inconsistencies in the Grabber's activities.
| 2. | Before the Grabber application is opened for the first time after being configured on a computer, the system assigns the Not logged in/Error |
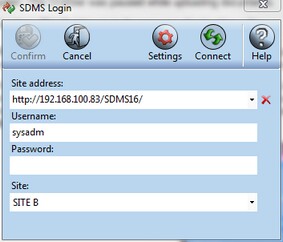
| 3. | Log in with your user name, password, and site. Upon successful login, the SDMS Grabber status changes to the Ready |
![]() IMPORTANT When connecting to an instrument, take heed that other Grabbers are not connected to that instrument already. Two users who try to connect to the same instrument will completely neutralize each other's actions and, moreover, are likely to cause damage to the system.
IMPORTANT When connecting to an instrument, take heed that other Grabbers are not connected to that instrument already. Two users who try to connect to the same instrument will completely neutralize each other's actions and, moreover, are likely to cause damage to the system.
| 4. | Make sure that the software/instrument/scanner that creates the files is configured to send the files to the SDMS Grabber folder. |
![]() IMPORTANT When files appear in the SDMS Grabber directory, the Uploading
IMPORTANT When files appear in the SDMS Grabber directory, the Uploading ![]() icon appears, indicating that the file is being uploaded by the Grabber. As files appear, they are automatically buffered in memory by the Grabber, so no changes to the original files are possible. From that point, the files are uploaded to the server from a memory stream.
icon appears, indicating that the file is being uploaded by the Grabber. As files appear, they are automatically buffered in memory by the Grabber, so no changes to the original files are possible. From that point, the files are uploaded to the server from a memory stream.
| 5. | To view the Grabber's service configuration settings, click the Settings button; the read-only Service Configuration dialog box appears. For information about how to fill in this dialog box, see section Configuring Grabber Service. |
| 6. | Make sure that the software/instrument/scanner that creates the files is configured to send the files to the SDMS Grabber folder. |
| 7. | Click the Connect button to test connection with SDMS. |
| 8. | Click Confirm. Now the Grabber starts its service of automatically uploading documents and instrument messages into SDMS, according to previously defined settings, which are explained in prior subsections of this chapter. |