![]() Use the Workflow Designer window to create new workflows and to view and edit existing workflows. The designer is a graphical tool that allows you to build and visualize a workflow using stage boxes (squares) and logic operators (circles) connected by actions (arrows). Logic operators determine if all or some of those steps are required before progressing to the next stage (of one or more task boxes). The arrows represent the flow of the workflow stages.
Use the Workflow Designer window to create new workflows and to view and edit existing workflows. The designer is a graphical tool that allows you to build and visualize a workflow using stage boxes (squares) and logic operators (circles) connected by actions (arrows). Logic operators determine if all or some of those steps are required before progressing to the next stage (of one or more task boxes). The arrows represent the flow of the workflow stages.
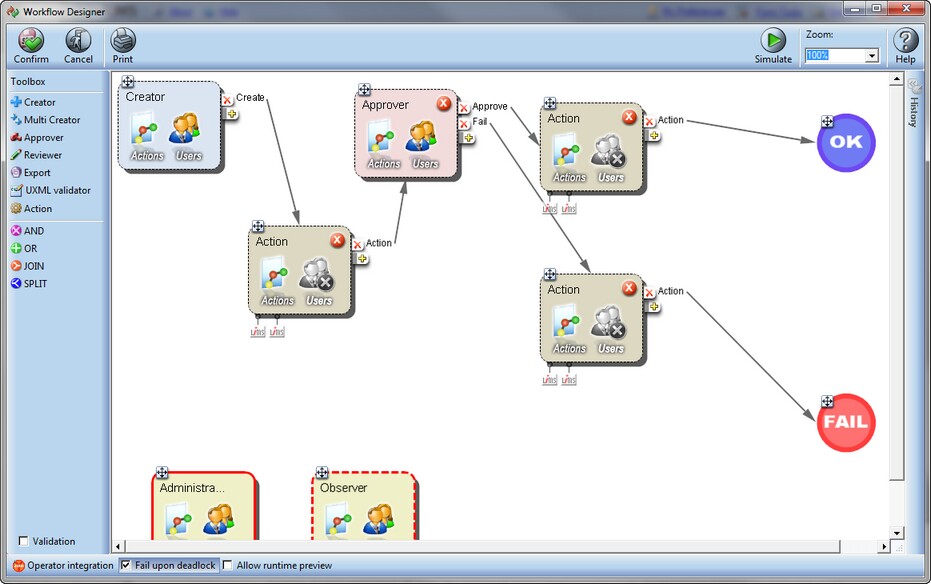
The Workflow Designer window allows you to manage a workflow using graphical objects. To add task boxes or logic operators, you click on one of the tasks or operators in the Toolbox pane, and then click again inside the workflow pane. To launch the Workflow Designer window, open the application at path Utilities > SDMS Admin. Click on the Workflows tab, then click Add or Edit to create a new workflow or edit an existing one, respectively. For detailed instructions, see the next procedure To configure a workflow template.
Workflow Stages
Stages are depicted as squares in the workflow pane. Use the following information to configure the steps, which are represented by the task boxes in a workflow. For detailed configuration information, see the next section Configuring a Workflow Template and for an example of configuring and then executing the different paths of a workflow, see section Example for Using Flags in a Workflow.
Stages have the following properties:
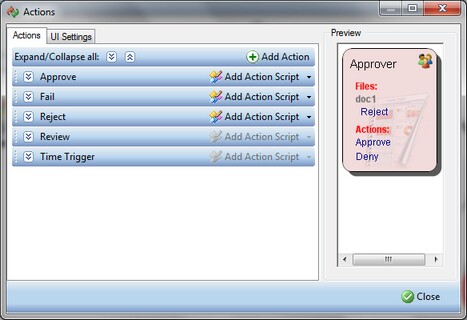
| • | Actions - Contains actions that can be executed when the workflow has reached this stage. Actions are predefined by stage type, but additional custom actions can be added to any stage. Custom action scripts can also be attached to actions to introduce custom behavior to the action, including modification to document properties and modification to the flow itself, based on the data that the document contains. |
| • | UI Settings tab - Allows modifications to the visual properties of the stage. It can also be used to translate the actions and UI to a different language like Spanish or French. |

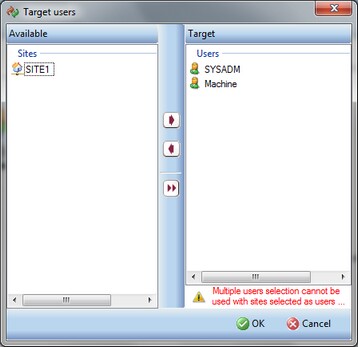
| • | Users - Defines the users that are allowed to take part in that stage, and execute its actions. Users can be selected specifically by username, teams, or sites. |
Predefined Workflow Stages
Creator - This is typically the initial step of a workflow where a document is introduced. The document may be either new or a revision of an already-existing document. The document moves to different stages in the workflow depending on the action taken by the user:
| • | Create action path is taken when a document is initially attached to the workflow. |
| • | New Revision action is taken when the document is modified, and a new revision is uploaded (for example, after being rejected by an approver). |
| • | New Revision to Rejector action is taken when the document is modified after being rejected, and a new revision is uploaded and sent to the user who rejected the original document. |
| • | No Change action is taken when the original document has been rejected, but the user decides not to modify it. |
| • | No Change to Rejector action is taken when the original document has been rejected, but the user decides not to modify it and sends a notification to the user who rejected it. |
| • | On Time Trigger is used as described in the next description Reviewer and Approver. |
Multi Creator - This stage is the same as Creator, but you can use this feature to introduce multiple documents into a workflow.
![]() TIP The Creator stage can be easily converted to a Multi Creator stage by right clicking on the stage and selecting "Multi Creator". The same can be done for Multi Creator stage to convert it to a single Creator stage.
TIP The Creator stage can be easily converted to a Multi Creator stage by right clicking on the stage and selecting "Multi Creator". The same can be done for Multi Creator stage to convert it to a single Creator stage.
Reviewer and Approver - Personnel at this stage can perform similar tasks, except an approver is not offered the option to edit. A Reviewer can edit the document with the result that a new version of the document is saved in SDMS. Use the Reviewer task box to allow users to review and modify the documents in the workflow. Editing can be followed by continuing actions or ending the workflow.
The following options are shared by both Reviewer and Approver:
| • | Reject - Rejects a document. When you enable rejection, multiple radio buttons become available: |
| o | Original Creator Only - The rejected document reverts to the Creator (or Multi Creator) task box step, where the associated users can make the appropriate changes and resume the workflow. |
| o | Last Revisor - The rejected document proceeds to the last stage, where the associated user(s) approved or edited it, typically a Reviewer task box. The same users take the necessary actions to resume the workflow. |
| o | Specific stage - The rejected document proceeds to a designated task box in the flow for the next action to be performed upon rejection. The target task box must be in the path the document has traveled. |
| o | Chronological - The rejected document goes to the last step during which the document was changed. It skips the steps where the document was simply approved. |
| o | Resume from current stage check box indicates that after the appropriate modification of the document, the workflow will resume from the current stage, skipping all the steps that come before it. |
| • | Approve - The document is so far and additional actions can be taken based on this fact. Select the next task box or conclude the workflow by branching to the OK circle at the end. The following radio buttons are available for this action: |
| o | User Selection - Use this field group to allow multiple users perform this action. Mark the Users Selection Enabled option to enable adding users to perform this action, and mark the Allow multiple users option if you want to add more than one user for this action. |
| o | Comments - Use this field group to define comments for this action. Mark the Prompt for Comments option to prompt a comment from a user who performs this action, and mark the Require comments option if you want to make adding comments mandatory when performing this action. |
![]() NOTE These radio buttons are available for more actions besides Approve, such as Reject, Fail, Review, Edit, and Action.
NOTE These radio buttons are available for more actions besides Approve, such as Reject, Fail, Review, Edit, and Action.
| • | Fail - The document has issues and additional actions can be taken based on this fact. Select the next task box or conclude the workflow by branching to the Fail circle at the end. |
| • | Time Trigger - Use this feature to time the next step/action. After a specified time elapses, unless an alternative action was performed, the workflow proceeds to the designated trigger step/action such as sending the document to a reviewer or emailing a message to a user reminding the user to open and address the original workflow step. |
To configure, specify a time such as 1 hour and in On Time Trigger select the next task box, such as an Action task box, with the email action configured. If using an email reminder, branch from the email action task box to the original task box by using a JOIN logic operator. After one hour, an email message prompts the emailed user to address the task.
![]() TIP Action names like "Approve" or "Fail" serve as indicators to users. Those are simply action names the user can choose to execute, and their effect is determined only by the target of that action. For example, redirecting the "Approve" path to the "Fail" circle will actually fail the workflow. All stages and actions can be renamed to be user-friendly, so users will know the consequences of actions taken.
TIP Action names like "Approve" or "Fail" serve as indicators to users. Those are simply action names the user can choose to execute, and their effect is determined only by the target of that action. For example, redirecting the "Approve" path to the "Fail" circle will actually fail the workflow. All stages and actions can be renamed to be user-friendly, so users will know the consequences of actions taken.
Approver only - Besides the prior actions, Approver, when used alone, can also perform the following tasks:
| • | Review - Use to specify a review as the next step in the workflow. Available Reviewer task boxes are offered for selection in the drop-down list. |
Reviewer only - Besides the prior actions, Reviewer, when used alone, can also perform the following tasks:
| • | Edit - Use to send the document for editing. Available Reviewer task boxes are offered for selection in the drop-down list. |
| • | Check out - Use to enable or disable user check-out of the document. |
Export - Use in workflows where the final step of the process is routing the file's parsed content to STARLIMS where data can be imported into LIMS tables. See the prior bullet for information about Time Trigger.
XML Validator - Use in workflows where you want to validate the UXML of the document. The stage includes actions Approve, Reject, Fail, Time Trigger, and Check out, as depicted above.
![]() NOTE At this stage, as well as at most of other stages of the workflow, you can add additional actions (explained next) to the task box by pressing the Add Action button. Similarly, you can add an action script to further modify your action by pressing the Add Action Script button.
NOTE At this stage, as well as at most of other stages of the workflow, you can add additional actions (explained next) to the task box by pressing the Add Action button. Similarly, you can add an action script to further modify your action by pressing the Add Action Script button.
Action – Use to perform actions in the workflow. For information about how an Action task box can be used in a workflow, see the procedure To create a workflow template. The Action task box can include the following:
| • | Action – Name the action performed, specifying its functionality. |
| • | Send Email – Send an email notification to the email address specified. You provide text for the email. |
| • | Move to File Type – Click the File Types drop-down box and select from the types configured at path Utilities > SDMS Admin > File Types. |
| • | Copy to ELN Document – Typically used to move documents of “Method execution ELN” type into active ELN templates in an approval workflow. |
| • | Move to Project – Click the Projects drop-down box and select from the projects configured at Client Relations Manager > Client Projects. |
| • | Change Team Privacy – Select from the Teams configured in the Permissions Editor. To open the editor, click the File Types tab at path Utilities > SDMS Admin and click Permissions. Select the Team node to view available teams. |
| • | Add flags – Flags are associated with documents. To enable adding flags to the documents in a workflow, enable Add Flags and mark the check boxes in the resulting window. |
| • | Remove flags – Remove flags associated with a document. Enable Remove Flags and mark the check boxes in the resulting window. |
| • | Convert to PDF – Convert documents such as Word documents into PDF. Mark the Attach original and/or Include Comments check boxes to include either. |
Administrator and Observer - These special stages are used to inspect the execution of a workflow (Observer), and take action (Administrator). Users selected as workflow administrators always see the current state of the workflow and can execute any of its available actions. Administrator users also have two special actions - Instant Fail and Instant Success, which immediately end the workflow with the appropriate status.
Logic Operators
Actions can be added and then linked to other stages with either arrows or logic operators. Logic operators are depicted as circles in the workflow pane. The available logic operators are described next:
| • | AND - Used to indicate that the workflow can only continue if all steps that are connected with this operator are executed. For example, if two review steps are connected by AND, both review steps need to be performed before moving to the succeeding Approval stage . |
| • | OR - Used to indicate that finishing either of the steps is sufficient to continue to the next step. For example, if two documents are connected by OR before the Approval stage, the system can continue to the Approval(s) after one document is available. |
| • | JOIN - Perform at least one step to move to the next stage and after the system moves to the next stage, users can perform the prior steps that were part of a JOIN operator. For example, if two documents are connected by JOIN prior to an Approval stage, the system will move to the approval(s) if only one document is available, yet the second document can be generated and updated later. |
| • | SPLIT - This tool is used to split assignments to branch out to two or more workflow steps. This allows the user to create more than one output arrow to connect stages. For example, an Approval stage can branch into two different actions. |