![]() Documents can be processed by designated personnel when you make them part of a workflow. The following instructions describe how workflow templates are configured using the Workflow Designer window.
Documents can be processed by designated personnel when you make them part of a workflow. The following instructions describe how workflow templates are configured using the Workflow Designer window.
Even if you are not involved in a workflow, if you have access to documents, such as through file type or project, you can use the Incoming Queue application to view progress of the documents regarding the workflow. For example, you can check if uploaded documents are recognized and have become attached to a workflow.
![]() IMPORTANT If you can edit documents that are part of a workflow when you are outside the workflow, be cautious. If a document is edited this way even though it is in a workflow, a new revision is created of the document outside the workflow, although the original version is still in the workflow. If a user modifies the workflow document, another revision of the document is added. Determining which version is latest and if both versions contain different information, what should be included, can be confusing.
IMPORTANT If you can edit documents that are part of a workflow when you are outside the workflow, be cautious. If a document is edited this way even though it is in a workflow, a new revision is created of the document outside the workflow, although the original version is still in the workflow. If a user modifies the workflow document, another revision of the document is added. Determining which version is latest and if both versions contain different information, what should be included, can be confusing.
>> To configure a workflow template
| 1. | Log on as a user with access to Utilities > SDMS Admin and open that branch. |
| 2. | Click on the Workflows tab to view existing workflow templates. |
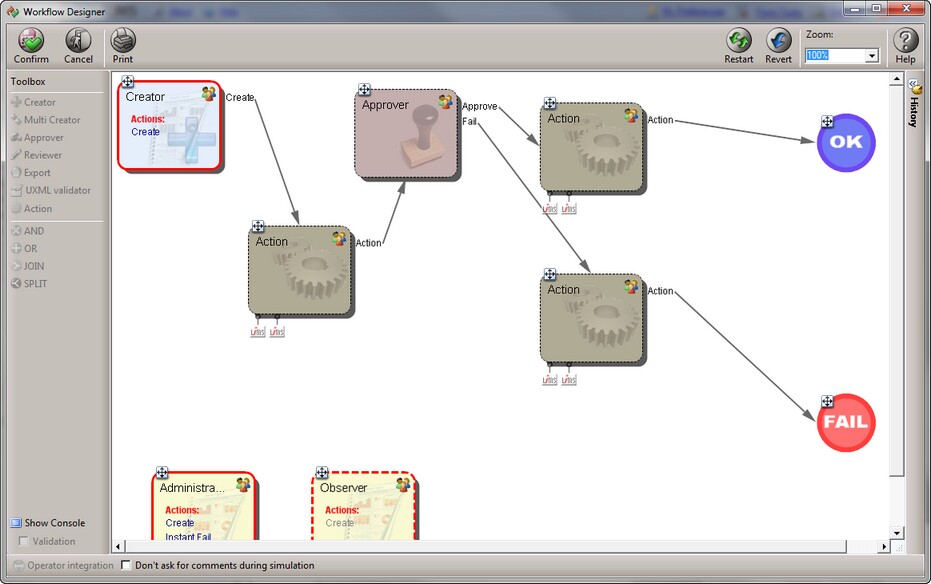
| 3. | To add a template, click Add. The Workflow Designer window opens with an initial Creator task box placed in the workflow pane. The Creator task, for uploading a document, is the first stage of every workflow. Otherwise to open a highlighted template, click Edit. |
| 4. | Select users, groups, or sites to which you want to assign permission to perform a task such as Creator. Inside a task box, click on the Users icon. In the Target users window, select entities such as users to be able to perform the task. Click OK to accept your selections. |
| 5. | Document processing follows branches according to actions taken by users performing tasks. To configure branching, click the Actions icon inside a task box such as Creator. |
![]() TIP In the case of the Creator task box, the actions include On Create (for creating a new document), On New Revision (for creating a new revision for an existing document), On No Change (no change to the document, yet the workflow has been initiated), and more. Configure a branch for each action that can potentially be used for processing in the workflow on which you are working. To create a branch, use either drop-down box and select the next object to which to branch such as a Review task box or JOIN logic operator. For more information, see the description for Reviewer and Approver in the prior section Workflow Designer.
TIP In the case of the Creator task box, the actions include On Create (for creating a new document), On New Revision (for creating a new revision for an existing document), On No Change (no change to the document, yet the workflow has been initiated), and more. Configure a branch for each action that can potentially be used for processing in the workflow on which you are working. To create a branch, use either drop-down box and select the next object to which to branch such as a Review task box or JOIN logic operator. For more information, see the description for Reviewer and Approver in the prior section Workflow Designer.
| • | Use the drop-down list next to an action such as On Create and choose the next task or logic operator to branch to when this action is taken. If you haven't yet added another task or logic operator to which to branch, you can leave the default None and reopen Actions later to select a task/operator that exists. |
| • | Optionally, you can edit a stage's Friendly message to provide instructions, tips, or other information useful in performing the task. |
| • | To add an action script to further enhance your template, click the Add action button. For more information on action scripts, see section Action Scripts. |
| • | When satisfied with your selections, click Close. If you selected a task or logic operator to which to branch, arrows are added branching from the Creator (or other) task box to the selected objects. |
![]() IMPORTANT The Validation check box is used to verify that the workflow follows a logical flow, that is, every step is connected to a subsequent step. If this check box is marked, when an action such as adding a document leads to a locked flow (without the ability to progress the flow), a blinking "!" warning icon will be displayed inside the task box. Attempting to accept the non-functional workflow will display a warning message.
IMPORTANT The Validation check box is used to verify that the workflow follows a logical flow, that is, every step is connected to a subsequent step. If this check box is marked, when an action such as adding a document leads to a locked flow (without the ability to progress the flow), a blinking "!" warning icon will be displayed inside the task box. Attempting to accept the non-functional workflow will display a warning message.
| 6. | To add additional tasks or logic operators, click on one of the tasks or operators in the Toolbox pane then click again inside the workflow pane. The corresponding task box or operator is added to the workflow pane. |
| 7. | If you create additional task boxes, make sure that each box is connected through arrows to either another task box, logic operator, or the final OK and Fail statuses. To branch from a logic operator such as AND, click on the operator and while holding down the left mouse button, drag the mouse to the task box to which you want to branch. If you want to switch logic operators such as from AND to OR, right-click on an operator and select another logic operator from the resulting menu. |
![]() NOTE For more information about using logic operators, see the Logic Operators list in the prior section Workflow Designer.
NOTE For more information about using logic operators, see the Logic Operators list in the prior section Workflow Designer.
| 8. | If you add an Action task box from the Toolbox to the workflow pane, click the Actions icon within the task box. In the resulting dialog box, select from a number of actions such as Send Email, Add Flag, and so on. For the list of available actions and their descriptions, see the prior section Workflow Designer. |
| 9. | In addition to users who have permission to perform specific tasks, there are two other types of users who can be involved in a workflow: |
| • | Administrators are able to perform any of the workflow actions while the document is managed. An administrator can also instantly approve or fail a document at any stage. To assign a user an Administrator role, click on the Administrators button and select the user(s) you want. |
| • | Observers have permission to access and view the workflow progress, but do not have a permission to perform actions such as Review, Approve, and so on. Click on the Observers button and select user(s) to which you want to assign the Observer role. |
>> To test and finalize a workflow template
| 1. | Click the Simulate button to test the logic behind a selected workflow. |
| 2. | Click on each task box such as the Creator box and select from available actions such as Create or New Revision. Depending on the action selected, the workflow proceeds along the appropriate branch to the next step. |
| 3. | To suspend simulation, click Revert. |
| 4. | When you are satisfied that a document will progress through the workflow stages as intended, click Confirm to save the workflow template. |
| 5. | An input window opens for you to name the workflow. You can accept the current name of the workflow, if modifying a template, or type a descriptive name to create a new workflow. |
| 6. | When done, click Save to save changes and close the window. |
![]() TIP A workflow that specifically incorporates flags is available for you to copy and adapt or even to use as a training exercise. See the section Example for Using Flags in a Workflow.
TIP A workflow that specifically incorporates flags is available for you to copy and adapt or even to use as a training exercise. See the section Example for Using Flags in a Workflow.