![]()
![]() Flags can be used in workflows to allow very specific paths of access to documents. For example, some companies allow deletion of SDMS documents under very controlled circumstances for auditing purposes. Several users who can edit documents may not be allowed to delete the documents, even a document created in error, so another user, such as a supervisor, must be able to approve deletion of documents. Yet this approver does not edit documents.
Flags can be used in workflows to allow very specific paths of access to documents. For example, some companies allow deletion of SDMS documents under very controlled circumstances for auditing purposes. Several users who can edit documents may not be allowed to delete the documents, even a document created in error, so another user, such as a supervisor, must be able to approve deletion of documents. Yet this approver does not edit documents.
You can set up a workflow to allow the supervisor to approve deletion of a document when requested by a user who created/edited the document. The user flags the document for a supervisor to approve its deletion in a workflow. The supervisor uses a flag to allow deletion of the document by the user.
You can create a deletion approval workflow that handles the scenario just described using the following procedures.
Example: Restricting Deletion of Documents
To control deletion of a document as in the preceding scenario, use the following procedure to configure two flags:
| • | The Marked for Deletion flag, which marks a document for deletion and attaches it to a workflow for deletion approval. |
| • | The Allow Deletion flag, which is used to replace the other flag upon approval of the deletion. Thus the user who requested deletion of that particular document can now view the document again, and it includes a flag icon to indicate that deletion is available. |
>> To set up the flags in this example
| 1. | Open Utilities > SDMS Admin and click the Flags tab. |
| 2. | Click Add. In the Flag Configuration window, fill in the following fields: |
| • | Name - Type Marked for Deletion. |
| • | Image - Select a status icon to associate with the flag such as the delete.png icon which is a trash can. |
| 3. | Make the flag a group member by typing DeleteGroup in the Group box. Adding both flags to a group makes them mutually exclusive. |
| 4. | Make sure the Enabled check box is marked, but allow the other fields to remain blank. Click Accept. |
| 5. | Repeat the procedure to add the Allow Deletion flag, except use a different icon, such as the allowdelete.png icon which is a trash can with a check mark. |
>> To set permissions for the flags in this example
| 1. | Open Utilities >User Management, and select or create two users to be part of this workflow: |
| • | Both users must have LIMS role access to the SDMS applications Documents and My Tasks. |
| • | The users in the following setup have the default Everyone role (that is, the Method Developer option is unmarked). |
| • | Permissions are configured (using SDMS Permissions) as follows: |
| o | Site permissions are <not set>. |
| o | The project to be used to upload documents should be set to Allow for Upload; otherwise, project permissions are <not set>. |
| o | For the users who create and edit documents, file type permissions are set to Allow, except for Delete, which is <not set>. For the user who can approve deletion, file type permissions Browse and Read are set to Allow and the other permissions are <not set>. |
![]() TIP If you cannot alter an existing file type, add a file type to use in this flow and set the permissions as discussed. Do not attach a workflow to the file type because the flag will be used to do that.
TIP If you cannot alter an existing file type, add a file type to use in this flow and set the permissions as discussed. Do not attach a workflow to the file type because the flag will be used to do that.
| • | Synchronize both users with SDMS using the Sync SDMS link. |
For more information about creating users and configuring LIMS roles, see the Configuring User Access chapter of the Configuration and Concepts user manual on your installation CD.
| 2. | Open Utilities > SDMS Admin. Click the Flags tab. |
| 3. | Select the Marked for Deletion flag. Click Permissions. In the Permissions editor window: |
| a. | Select the User category. |
| b. | Select the user who should not delete a document until approval is received for the action. |
| c. | Set Allow for Add Flag and Remove Flag. Set Deny for all other flag permissions. |
| d. | Select the other user to approve the deletion. Set Allow for Add Flag and Remove Flag. Set Deny for all other flag permissions. |
Click OK.
| 4. | Select the Allow Deletion flag. Click Permissions. In the Permissions editor window: |
| a. | Select the User category. |
| b. | Select the first user who should not delete a document until approval is received for the action. |
| c. | Set Allow for Delete, <not set> for Browse, Read, and New Revision, and Deny for add/remove flag permissions. |
| d. | Select the other user who must approve the deletion and set Allow for Add Flag, Remove Flag. Set Deny for other flag permissions. |
Click OK.
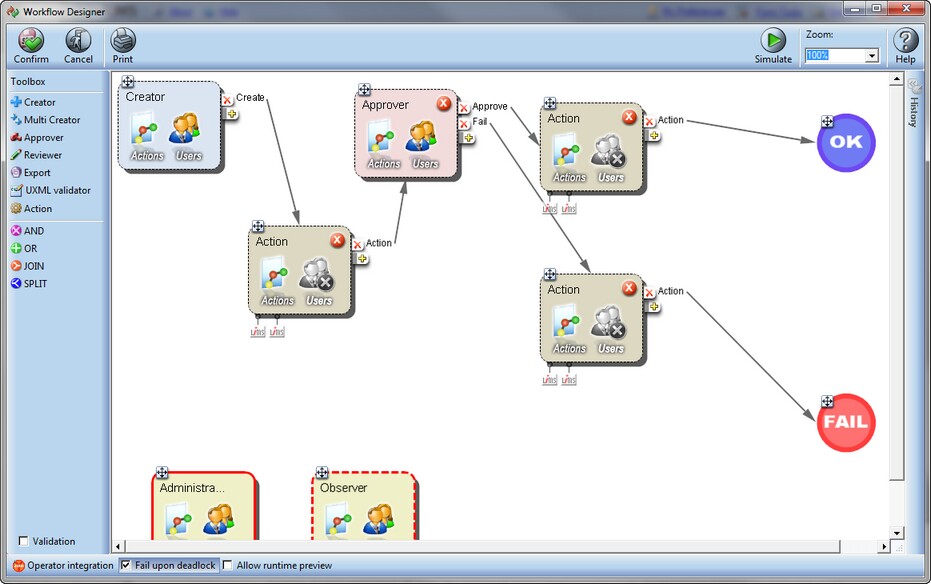
![]() NOTE Next, you will configure a workflow, such as the one depicted in the screen shot. For detailed explanation of this window, see section Workflow Designer.
NOTE Next, you will configure a workflow, such as the one depicted in the screen shot. For detailed explanation of this window, see section Workflow Designer.
>> To create the deletion approval workflow example
| 1. | Open Utilities > SDMS Admin and click the Workflows tab. |
| 2. | Click Add. The Workflow Designer window opens with an initial Creator stage box placed in the workflow pane. The Creator stage, representing an entry point to a document attached to the workflow, is the first stage of every workflow. |
![]() NOTE When a document is marked for deletion, it will enter the deletion approval workflow at this step.
NOTE When a document is marked for deletion, it will enter the deletion approval workflow at this step.
| 3. | Add an Approver stage box. Click on Approver in the Toolbox pane, and then click again inside the workflow pane. The corresponding task box is added to the workflow pane. For clarity, you can change the name of the step by double-clicking on Approver and typing Approve Deletion. |
| 4. | Add two Action task boxes after the Approval task box. Click on Action in the Toolbox pane then click again inside the workflow pane. Repeat the same procedure to add another Action box. Position one action box over the other to indicate alternative paths in the same step. |
| 5. | Now that the task boxes are in place, you can set up the flow from each stage box (step) to be determined by an action taken: |
| • | From the Creator stage box, use the mouse to drag an arrow from the "plus" sign to the Approver stage. Choose the Create action for the prompt. |
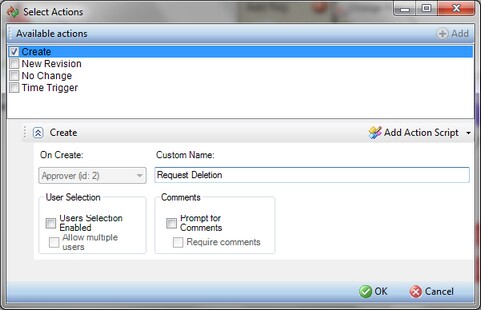
| • | You can give the action a custom name as well, like Request Deletion. |
| 6. | After choosing the action and clicking OK, the system will prompt for users that are allowed to execute that action: |
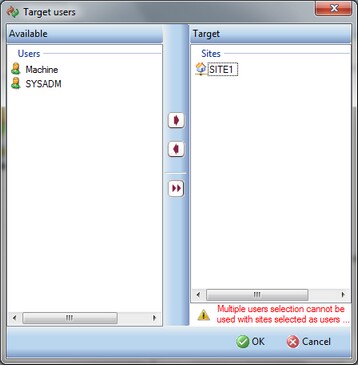
![]() NOTE Users are available to add to a workflow either singly or in groupings such as teams or sites.
NOTE Users are available to add to a workflow either singly or in groupings such as teams or sites.
| 7. | In the Approver task box (or Approve Deletion if you changed the name): |
| • | To select user(s) who should approve the deletion of the document, click the Users icon. In the dialog box, select user(s) by double-clicking the usernames. Alternatively, you can use the arrows to move highlighted usernames between panes. Click OK. |
| • | Click the Actions icon. In the dialog box, use the Fail drop-down box to select the bottom Action task box. In the On approve drop-down box, select the top Action task box, and then click Close. Two branching arrows appear, one to each Action task box. |
| 8. | Configure each of the Action task boxes: |
| • | To allow document deletion, configure the action(s) to be triggered as follows: |
| a. | Click Actions, select Enable in the Add flags section and in the resulting Flags pane mark the Allow Deletion flag. |
| b. | Select Enable in the Remove flags section and in the resulting Flags pane, mark the Marked for Deletion flag, and click Close. |
| c. | To branch to the JOIN logic operator, click anywhere on the Action task box and while depressing the left mouse button, drag the mouse to the JOIN circle (add the JOIN logic operator by clicking on the JOIN button in the Toolbox of the Workflow Designer window, and then clicking again inside the workflow pane). |
| • | To disallow document deletion, configure actions to be triggered as follows: |
| a. | Click Actions, select Enable in the Remove flags section and in the resulting Flags pane, clear the Marked for Deletion flag, and click Close. |
| b. | To branch to the JOIN logic operator, click anywhere on the Action task box and while holding down the left mouse button, drag the mouse to the JOIN circle. |
| 9. | You can click the Simulate button to test the workflow. It is okay for the Fail to be disconnected as all actions lead to successful completion of the workflow. When done, click OK and type the name Approve Deletion for the workflow. |
![]() NOTE For detailed information about configuring workflows in general, see section Configuring a Workflow Template.
NOTE For detailed information about configuring workflows in general, see section Configuring a Workflow Template.
>> To attach the Marked for Deletion flag to the approve deletion workflow
Now that you have a workflow, you can edit the Marked for Deletion flag to include the workflow name. Then when a user attaches this flag to the document, it will enter the Approve Deletion workflow where it will appear in the My Tasks window for the user who can approve deletion of the document.
| 1. | Open Utilities > SDMS Admin and click the Flags tab. |
| 2. | Highlight the Marked for Deletion flag and click Edit. |
| 3. | In the Flag Configuration window, mark the Attach to Workflow check box. In the Workflow and Entry point drop-down boxes that appear, select Approve Deletion and Creator, respectively. |
| 4. | When satisfied with your selections, click Confirm. |
>> To run the workflow and approve the deletion request
| 1. | Log on as a user who can access/edit the file type for which you configured permissions. |
| 2. | Open SDMS > Incoming Queue and click Upload to upload a document into SDMS. Select the file type configured to control permissions as previously mentioned. Select a project for which <not set> is the configuration for all permissions for both users. Click Upload to close the dialog box and add the document. The uploaded document will appear in the grid. |
| 3. | Highlight the document in the queue and attach the Marked for Deletion flag to the document. |
| 4. | The document should automatically enter the Approve Deletion workflow, in which case it should appear in the other user's My Tasks window with an Approve link. |
| 5. | Log on as a user who can approve document deletions and open SDMS > My Tasks. |
| 6. | Highlight the document and click the Approve link. The document disappears from the tasks pane and reappears for the first user to see in Incoming Queue with the Allow Deletion flag attached. |
| 7. | Log on as the first user again, select the document, and delete it. |
>> To run the workflow and reject the deletion request
| 1. | Perform steps 1 through 5 in the prior procedure To run the workflow and approve the deletion. |
| 2. | Highlight the document and click the Fail link. The document disappears from the tasks pane and reappears for the first user to see in Incoming Queue. No flag is attached so the user can modify the document, but cannot delete the document. It would be up to the analyst to discuss the supervisor's requirements for approving the document's deletion before resubmitting the document for deletion. |
![]() TIP Another element that you can add into similar workflows is a third flag that sets permissions differently from the other two flags instead of reverting back to the document permissions as they were before any flags were set. Also, you can add a third Action task box into the workflow for use in triggering an action such, as attaching this third flag automatically if the approver does not respond in 48 hours.
TIP Another element that you can add into similar workflows is a third flag that sets permissions differently from the other two flags instead of reverting back to the document permissions as they were before any flags were set. Also, you can add a third Action task box into the workflow for use in triggering an action such, as attaching this third flag automatically if the approver does not respond in 48 hours.