![]() You can trace and view all the instruments connected to your Grabber, and manage their activities, such as pause or resume grabbing instrument messages, restart the connection between the Grabber and the instruments, and view the logs, documenting the instrument's connection with the system. In case an instrument has more than one physical layer defined for the connection with the system, the Grabber will also allow you to view and manage the connection with this instrument using this specific physical layer. For more information about SDMS connectivity with instruments, see section Instrument Protocol Translation Objects. For specific information about defining physical layers for an instrument, see section Designing the Protocol Physical Layer.
You can trace and view all the instruments connected to your Grabber, and manage their activities, such as pause or resume grabbing instrument messages, restart the connection between the Grabber and the instruments, and view the logs, documenting the instrument's connection with the system. In case an instrument has more than one physical layer defined for the connection with the system, the Grabber will also allow you to view and manage the connection with this instrument using this specific physical layer. For more information about SDMS connectivity with instruments, see section Instrument Protocol Translation Objects. For specific information about defining physical layers for an instrument, see section Designing the Protocol Physical Layer.
>> To manage the SDMS Grabber connected instruments
| 1. | Start the SDMS Grabber and log on, as described in section Starting Grabber. |
| 2. | Right click the Grabber icon to display the Grabber activities pop-up menu. Select the Instruments option, and then, from the instruments menu that appears, select the instrument whose activity you would like to manage. |
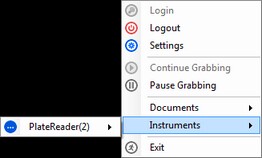
| 3. | From this instrument's subsequent menu, select one of the following options to manage the system connection with the instrument: |
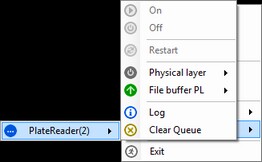
| • | Initiate or terminate the system connection with the instrument, by selecting On or Off options. |
| • | Restart the connection with the instrument, by selecting the Restart option. |
| • | Pause or continue grabbing instrument messages, by selecting the Pause or Resume options. |
![]() NOTE In case the instrument is connected to the system through more than one protocol and has therefore more than one physical layer defined (as appears in the picture above), all of the above commands will have to be executed through the sub-menu of a specific instrument's physical layer. In that case, all the commands will apply to the selected physical layer only. For more information about SDMS connectivity platform with instruments, see section Instrument Protocol Translation Objects. For specific information about defining physical layers for an instrument, see section Designing the Protocol Physical Layer.
NOTE In case the instrument is connected to the system through more than one protocol and has therefore more than one physical layer defined (as appears in the picture above), all of the above commands will have to be executed through the sub-menu of a specific instrument's physical layer. In that case, all the commands will apply to the selected physical layer only. For more information about SDMS connectivity platform with instruments, see section Instrument Protocol Translation Objects. For specific information about defining physical layers for an instrument, see section Designing the Protocol Physical Layer.
| 4. | If you want to erase the messages from the instrument that are waiting to be received into the system, select the Clear Queue option. The instrument might issue messages in big volumes, while the Grabber captures these messages one at a time, uploading them into SDMS one by one. If you are not interested in the instrument's past messages and want the Grabber to grab only messages issued at the given moment, you can use this option to erase the irrelevant messages before they are uploaded into the system, and thereby improve your work's efficiency. |
| 5. | If you want to view the logs of the instrument, capturing the history of the instrument's connectivity activities, executed using the physical layer of the instrument, select the Log option; the History Log dialog box appears. The tabs of this dialog box contain logs relating to existing physical layers of the selected instrument. |
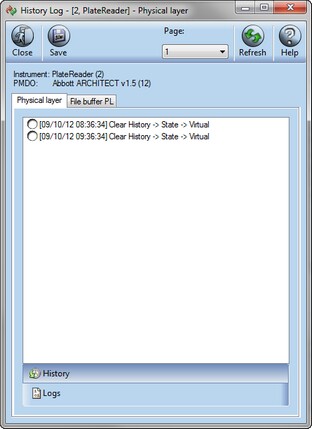
| 6. | Click each tab to view the logs of each physical layer. If there are too many logs, use the Page option to navigate through the logs. Note that you can save the logs in a text file on your local computer, by clicking Save. |